
- Troubleshooting Missing Styles in Session Replay & Heatmaps
- Sigmize Workspaces User Guide
- Cloning an Experiment in Sigmize
- Sigmize Experiment Lifecycle Guide
- User Profile Management Guide
- How to Invite Members to a Workspace in Sigmize
- How to Switch Organizations in Sigmize
- Let’s set up Organization & Workspace with Sigmize
- Getting Started with Sigmize
- How to Install and Connect the Sigmize WordPress Plugin
Sigmize MCP Server
Let Your AI Take Action for You
Large language models (LLMs) can write, summarize, analyze, and generate content. But with Model Context Protocol (MCP), your AI can now go a step further; it can actually perform actions inside Sigmize on your behalf.
With Sigmize MCP, you can connect AI tools like Cursor or Claude Desktop and give natural language commands such as:
- “Create a new A/B test for my homepage hero section.”
- “Show me the results for my currently running experiments.”
- “Pause the variation test on my pricing page.”
- “Set up a split URL test between two landing pages.”
Instead of manually navigating the Sigmize dashboard, your AI does it for you.
What is MCP?
Model Context Protocol (MCP) is a standardized protocol that allows AI tools to securely connect with external applications and execute approved actions.
In simple terms:
- MCP acts as a bridge between your AI and Sigmize
- You decide what permissions the AI gets
- The AI can securely perform those actions for you
No complex integrations. No custom coding.
Before You Start: Install Node.js (Required)
Node.js is required because MCP uses the npx mcp-remote command to establish a secure connection.
Install Node.js
For Windows:
- Go to the official Node.js website: https://nodejs.org
- Click Windows Installer (.msi) under the LTS version
- Download and run the installer
- Follow the installation wizard steps
- Once installed, open Command Prompt and verify: node -v
- Then verify npx: npx -v
If both return version numbers, you’re ready.
For Mac:
- Visit the official Node.js website: https://nodejs.org
- Click the macOS Installer under the LTS (Long-Term Support) version
- Download the .pkg file and run the installer
- Follow the installation steps provided by the installer
- After installation, open Terminal and type: node -v
- This should display the installed Node.js version.
- Also verify npx by running: npx -v
⚠️ MCP will not work in Cursor or Claude Desktop if Node.js is not installed.
How to Connect Sigmize MCP to Cursor
Step 1: Open MCP Setup in Sigmize
- Log in to your Sigmize dashboard.
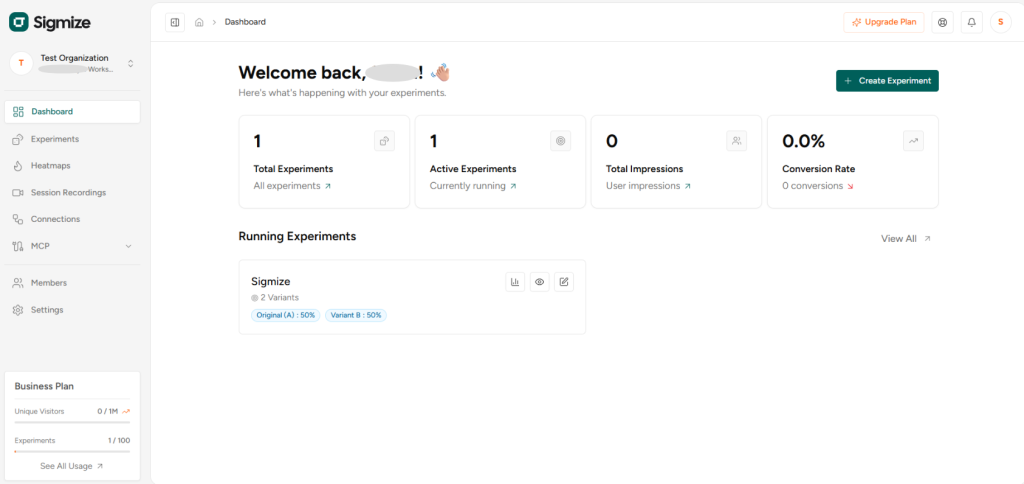
- From the left sidebar, click MCP
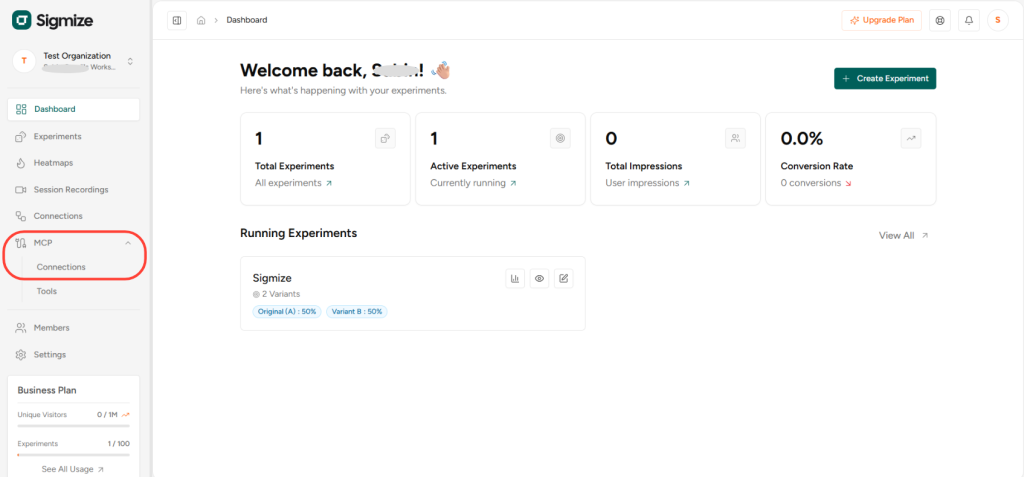
- Click Setup Instructions
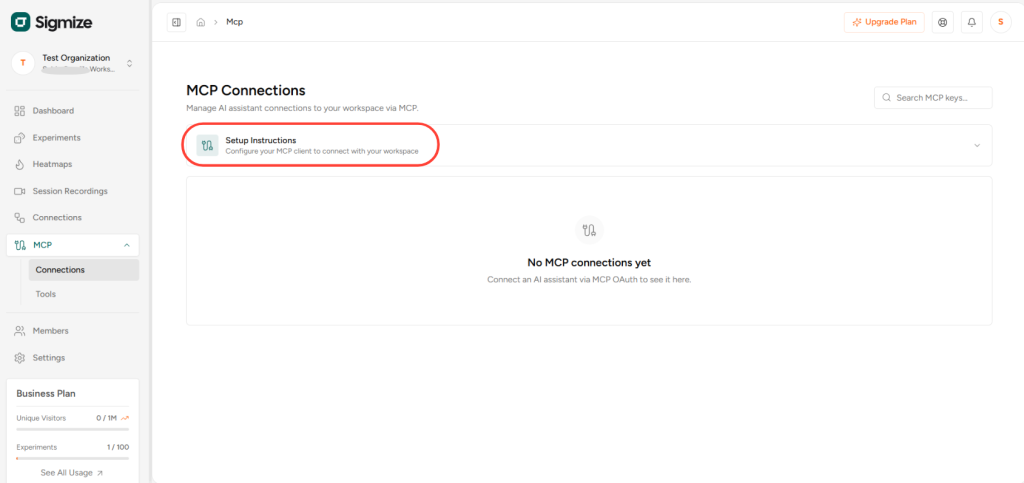
Step 2: Get the Cursor Configuration
- In Select your MCP Client, choose Cursor
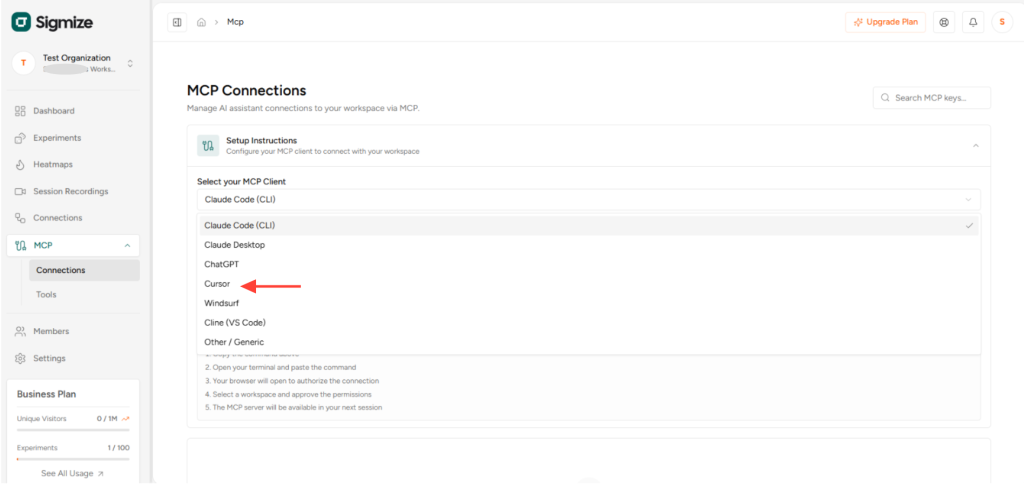
- Click Copy Configuration to copy the generated JSON configuration
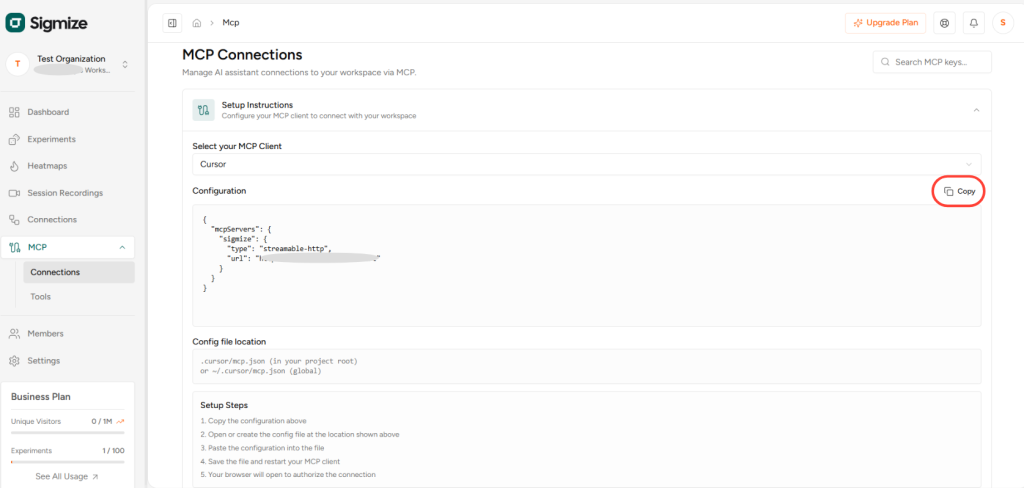
Step 3: Configure MCP in Cursor
- Open the Cursor application
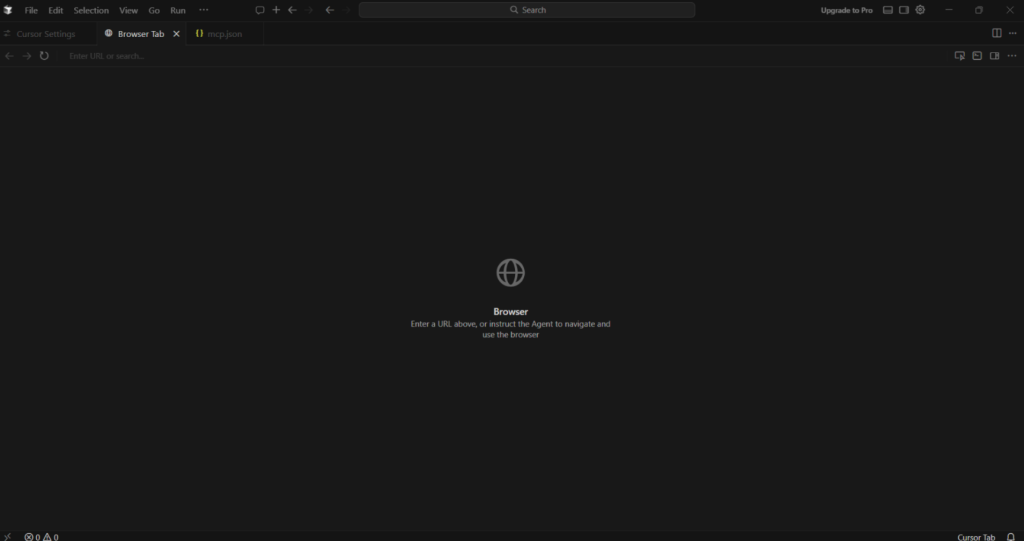
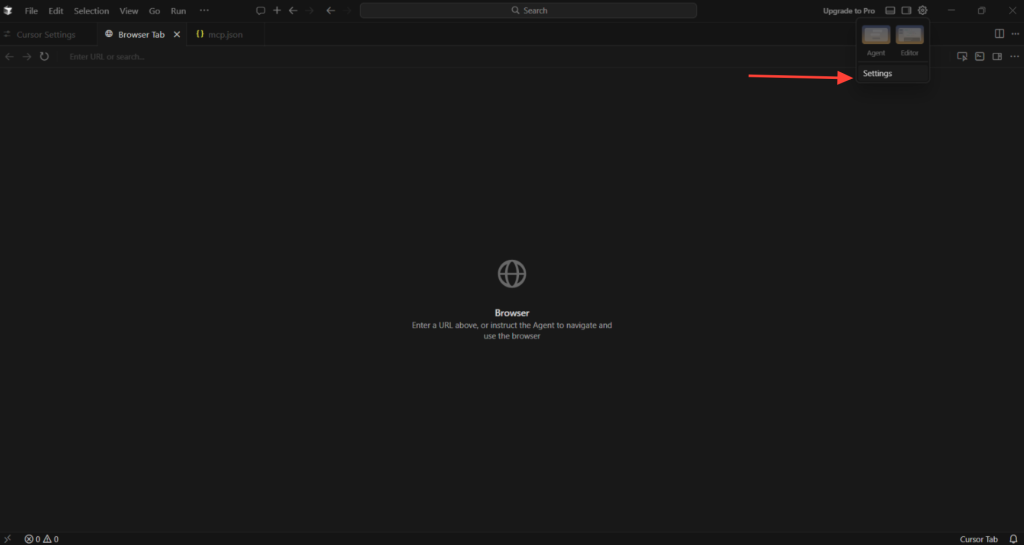
- Click Settings
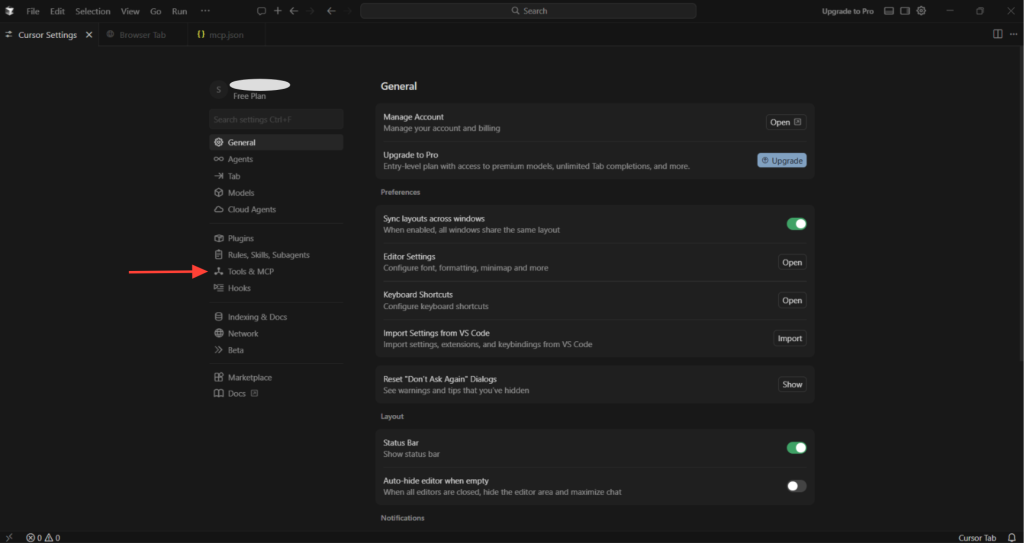
- Go to Tools & MCP
- Click Add Custom MCP
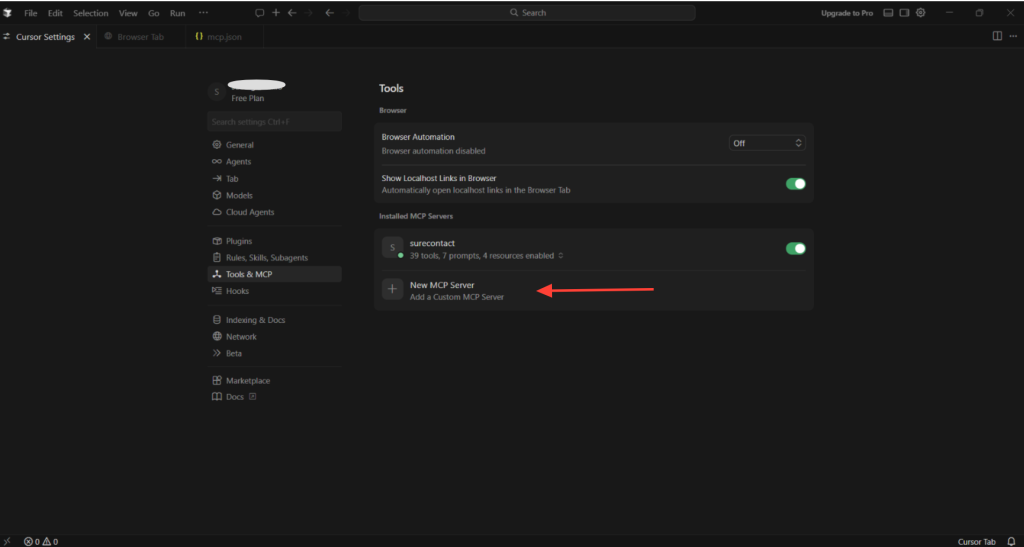
- Remove the default JSON configuration
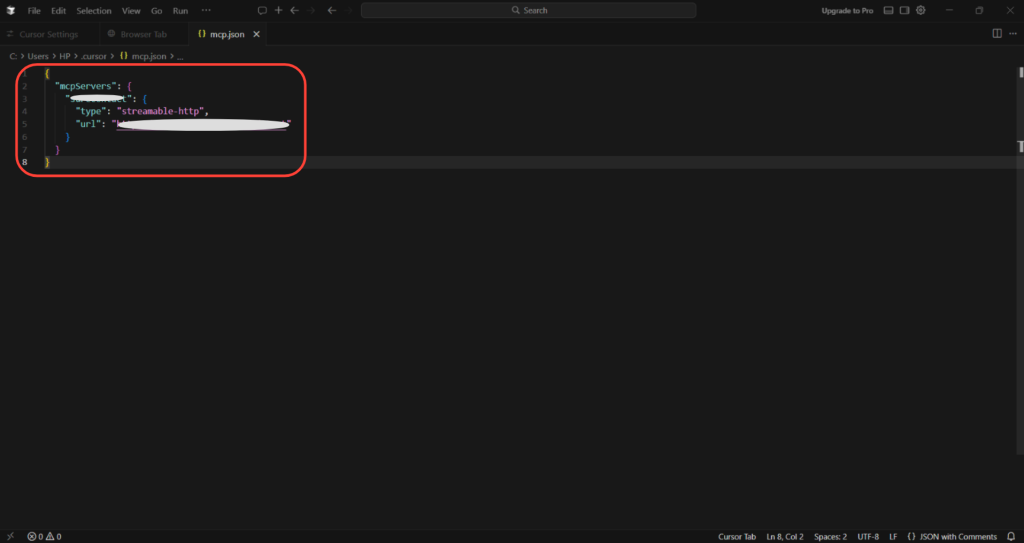
- Paste the configuration JSON you copied from Sigmize
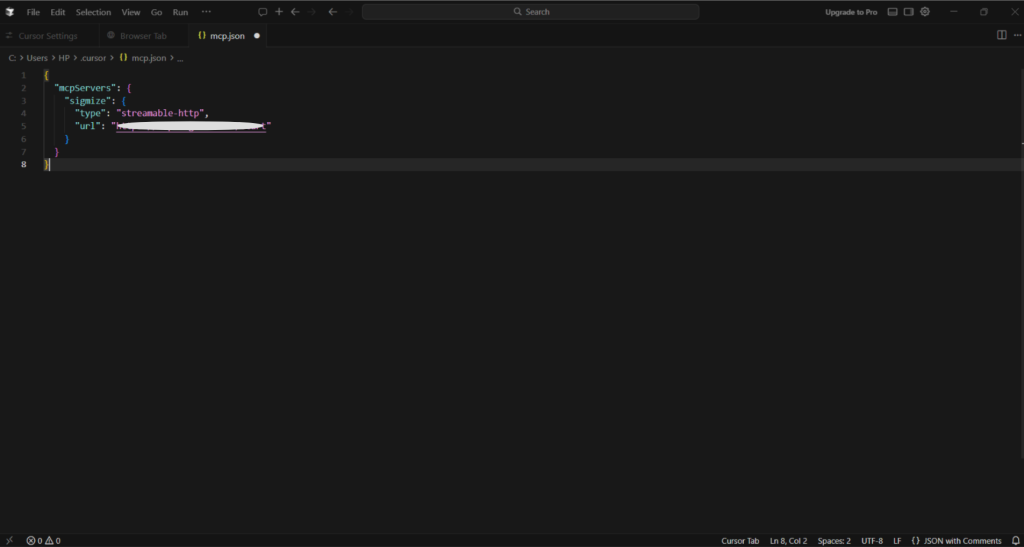
- Click Save and close the settings tab
Step 4: Authenticate the Connection
- Open Cursor again
- Go to Settings → Tools & MCP
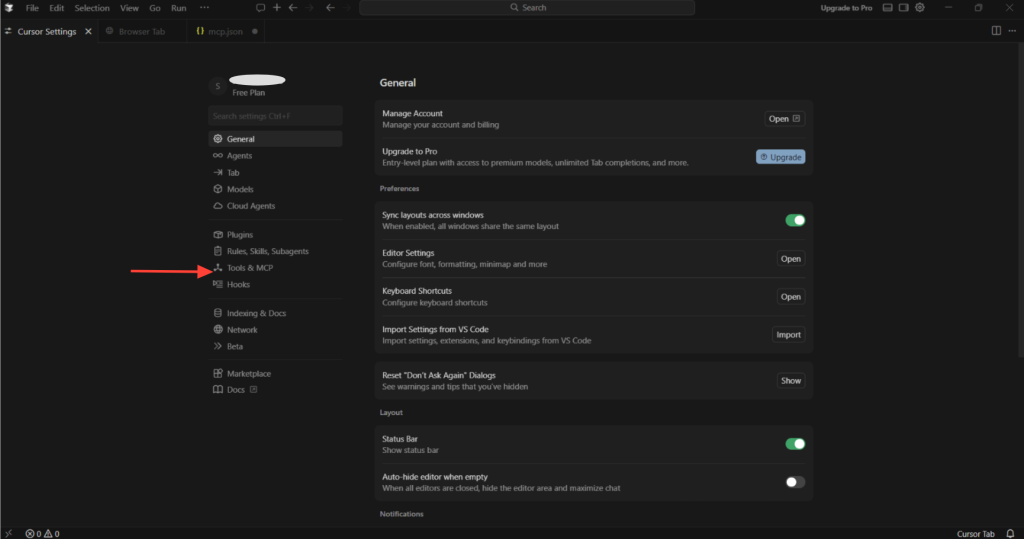
- You will now see Sigmize listed and asking for authentication
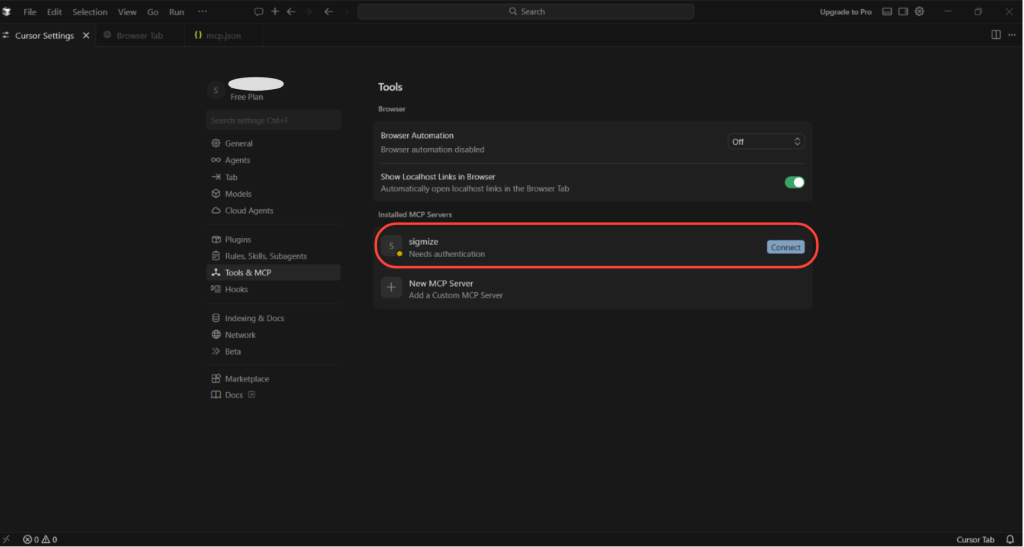
- Click Connect beside Sigmize
- You will be redirected to a browser window asking you to connect your Sigmize workspace
- Click Authorize
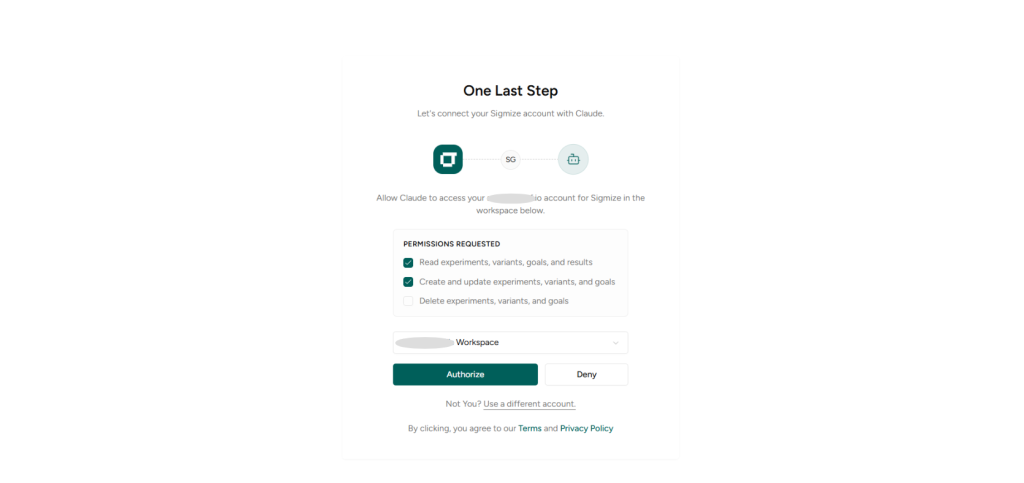
Once authorized, you will see an Authorization Successful message.
- You will then be prompted to open Cursor again. Click Open Cursor
Step 5: Verify the Connection
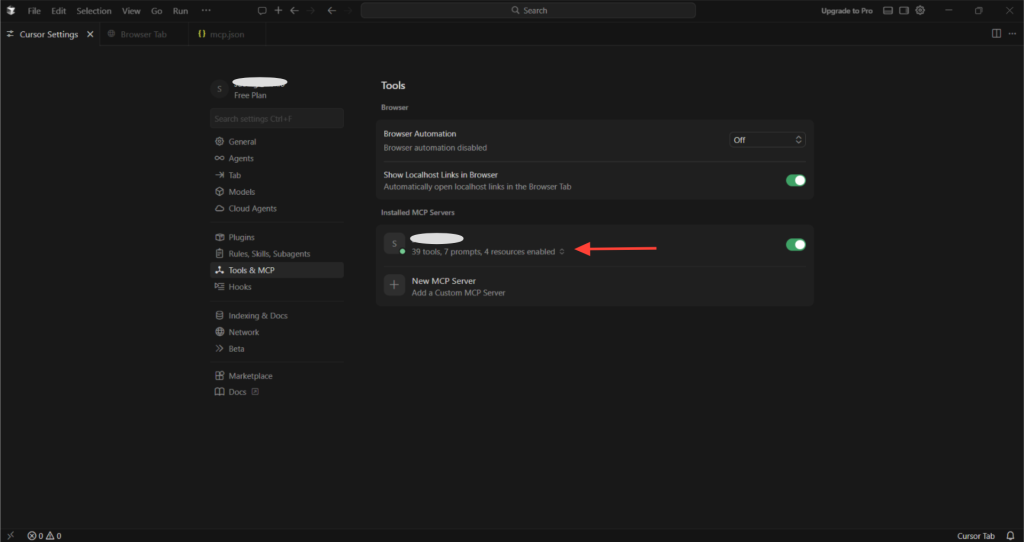
- Go back to Cursor → Settings → Tools & MCP
- You should now see Sigmize connected successfully
- The available events and actions will be listed under the Sigmize MCP server
Step 6: Start Using Sigmize MCP
- Click the + button to create a New Agent
- Enter prompts in natural language in the chat
Example prompts:
- Create a new A/B test for my homepage with two variations
- Show me the conversion rates for my checkout page experiment
Cursor will execute the actions directly using Sigmize MCP.
That’s it! Sigmize MCP is now successfully connected to Cursor.
How to Connect Sigmize MCP to Claude Desktop
Step 1: Open MCP Setup in Sigmize
- Log in to your Sigmize dashboard
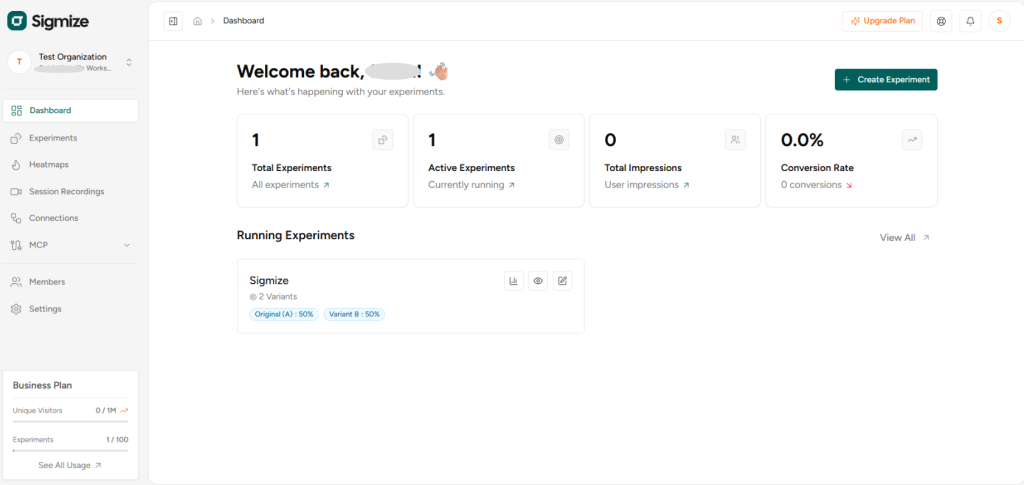
- Click on MCP from the sidebar
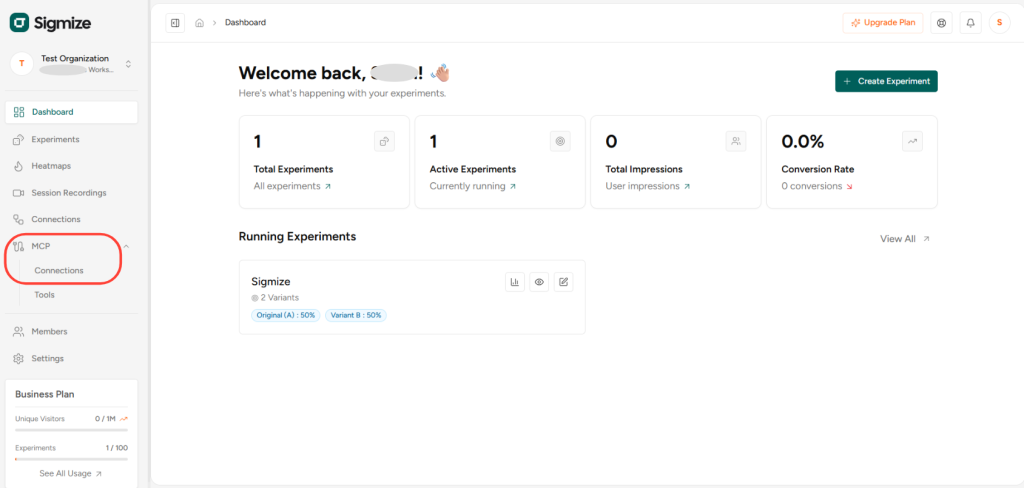
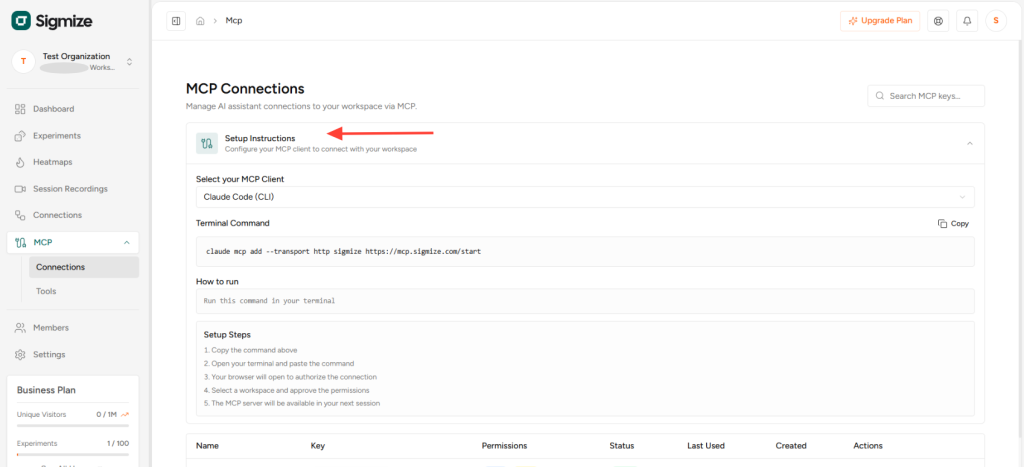
- Click Setup Instructions
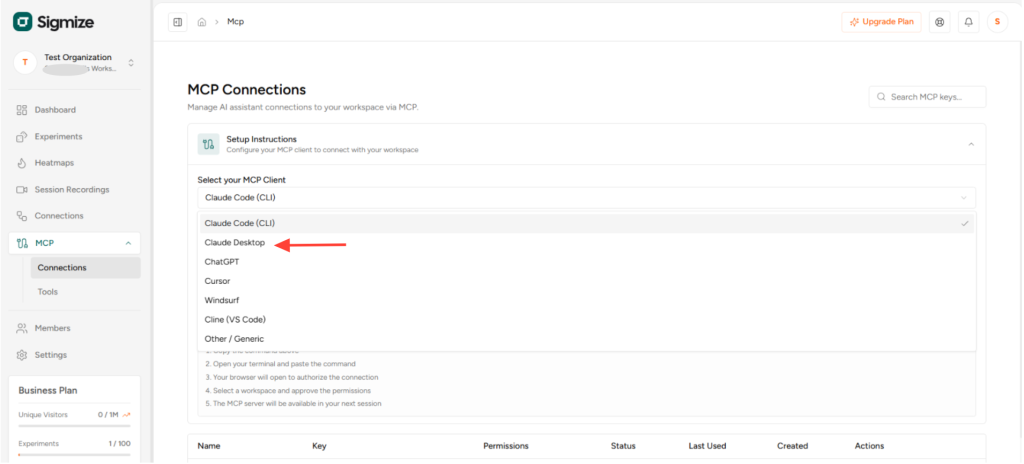
- From the MCP Client dropdown, select Claude Desktop
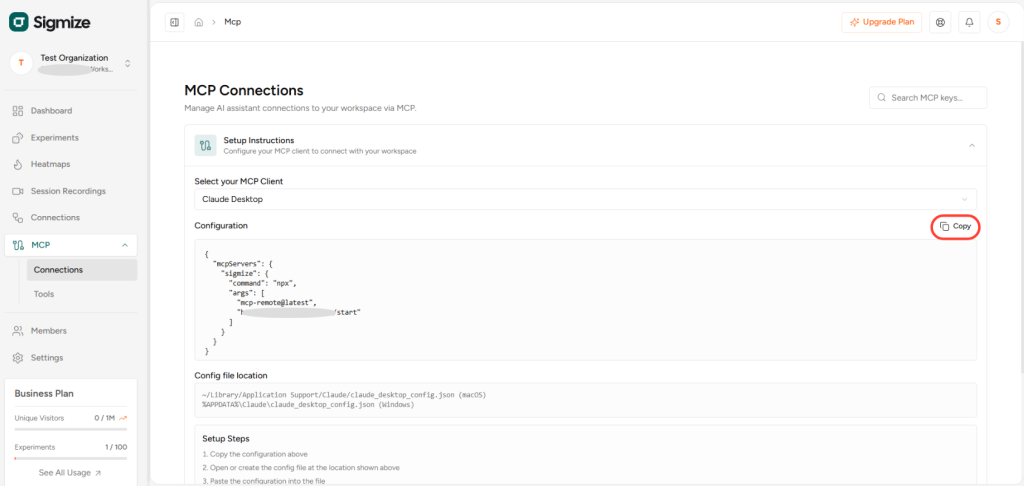
- Copy the configuration provided for Claude Desktop
Step 2: Open Claude Desktop Settings
- Open the Claude Desktop application
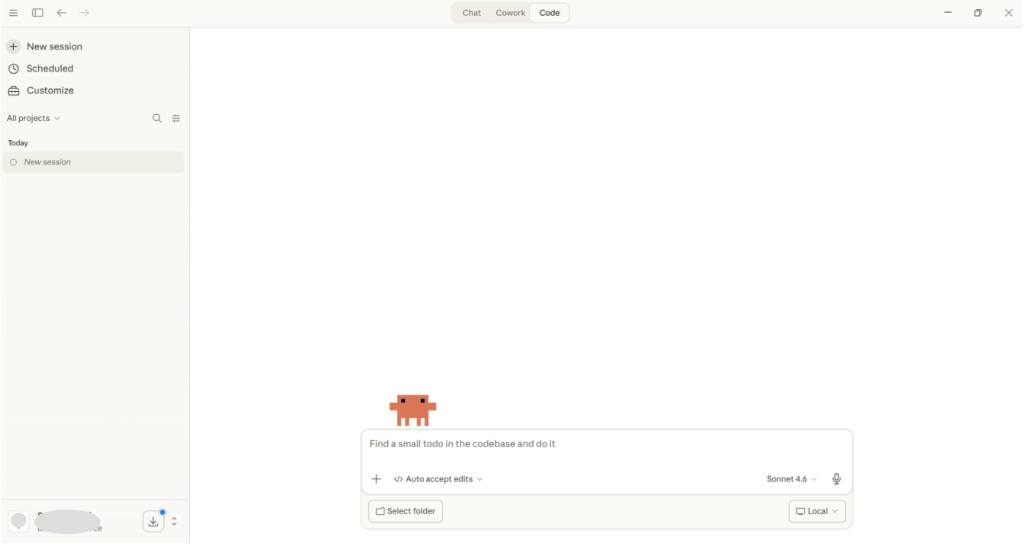
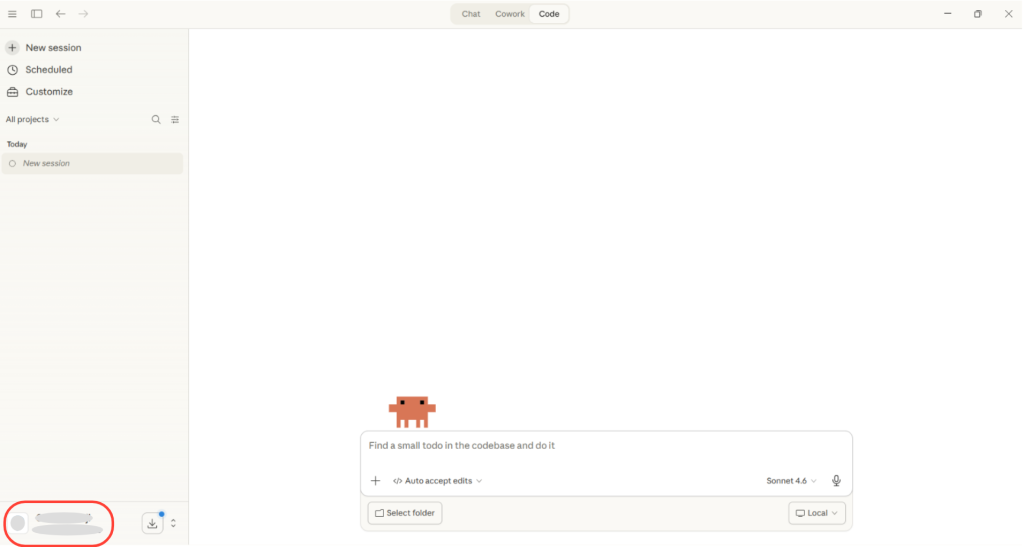
- Click on your Profile icon
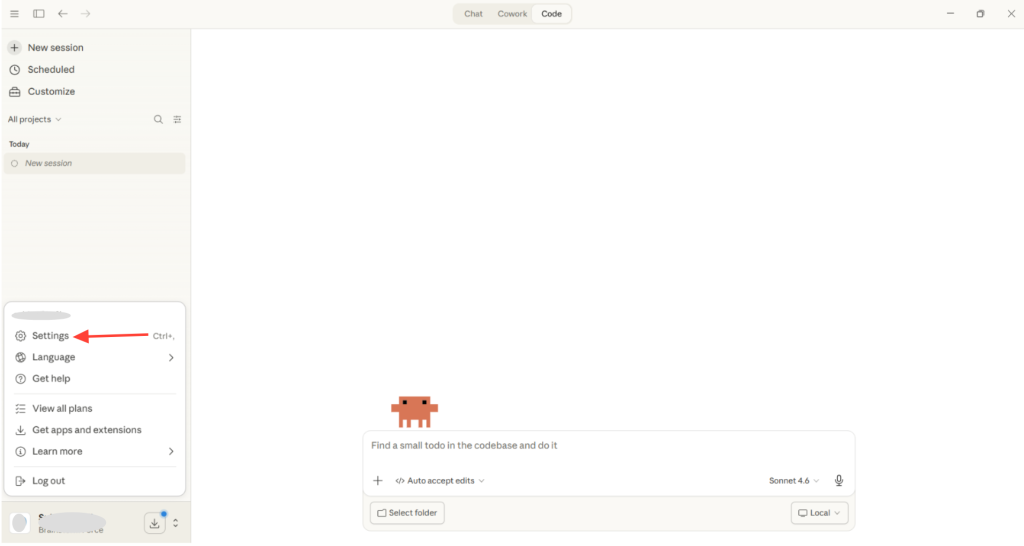
- Go to Settings
- Click on Developer
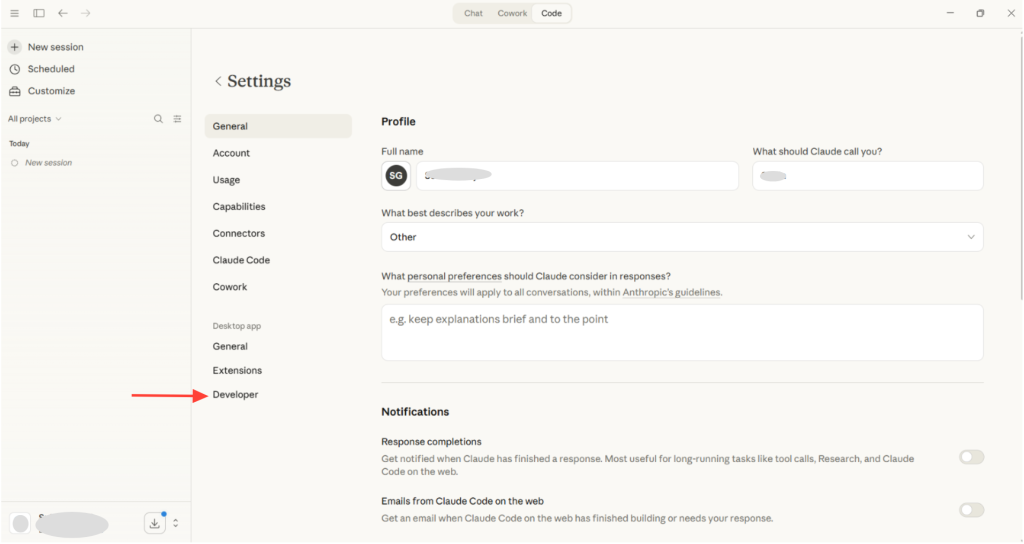
- Under Local MCP Servers, click Edit Config
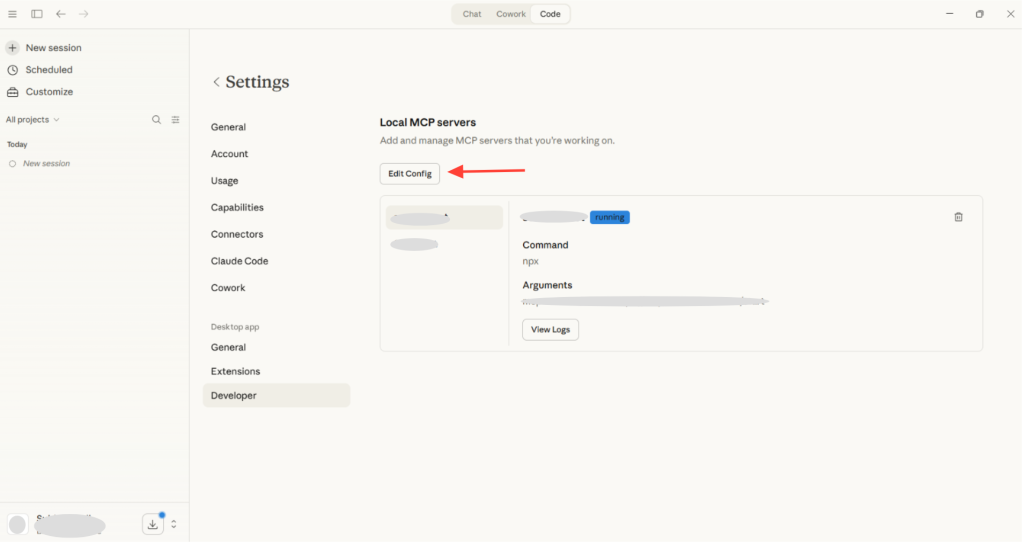
This will open the folder containing the claude_desktop_config.json file.
Step 3: Add the MCP Configuration
- Open the claude_desktop_config.json file using Notepad or any text editor
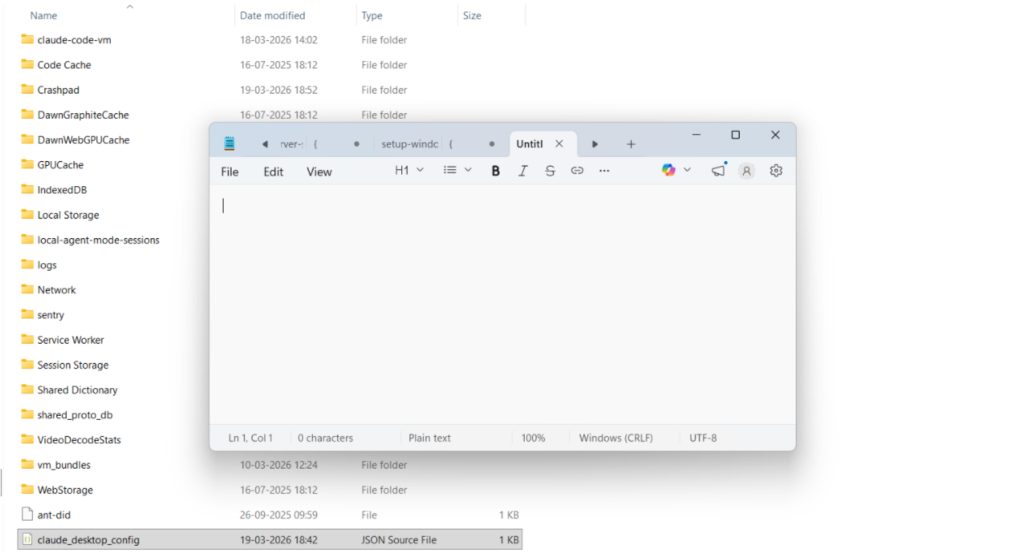
- Paste the configuration you copied from Sigmize
- Save the file
- Close the text editor
Step 4: Restart Claude Desktop
- Completely close Claude Desktop
- Exit the application fully
- Open Claude Desktop again
Step 5: Authorize the Connection
- Click your Profile icon again
- Go to Settings → Developer
- Wait for the page to load
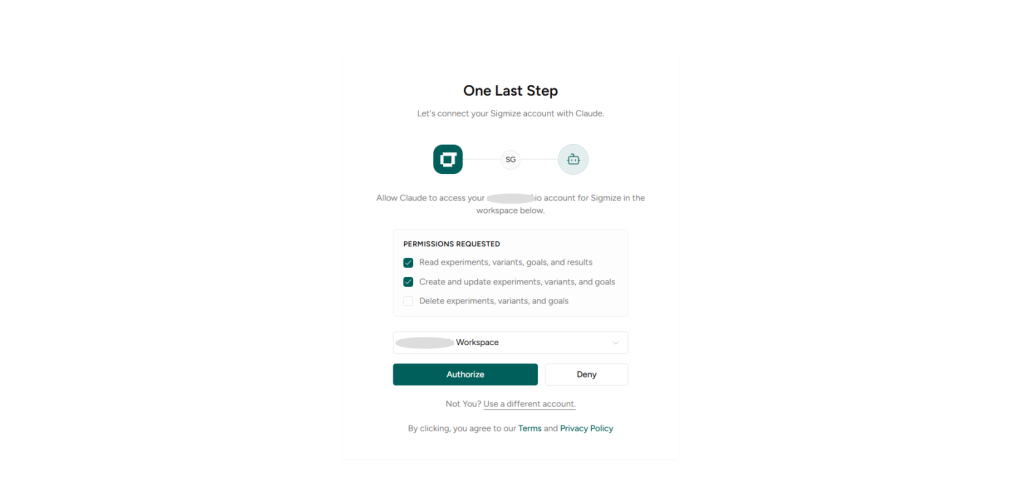
Claude will automatically open your browser in a new tab, where Sigmize will already be loaded.
- Click Authorize
Step 6: Verify the MCP Connection
Once authorized, Sigmize MCP will be connected to Claude Desktop.
You can now test the connection by opening a new chat and giving prompts such as:
- “Show me all active A/B experiments.”
- “Create a new split test for my product page.”
- “What are the results of my homepage headline test?”
Claude will now be able to securely perform actions inside Sigmize using MCP.
How to Connect Sigmize MCP to ChatGPT
Step 1: Open MCP Setup in Sigmize
- Log in to your Sigmize dashboard
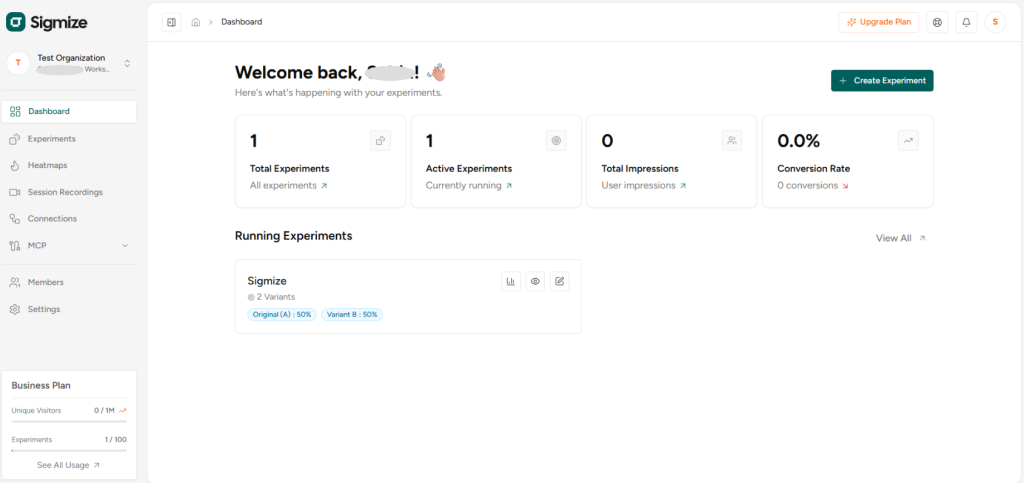
- Click MCP from the left sidebar
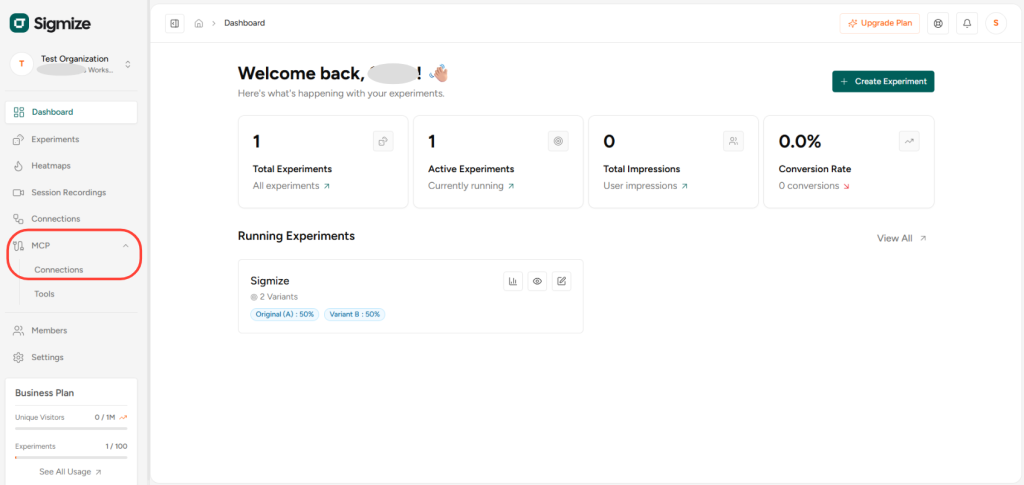
- Click Setup Instructions
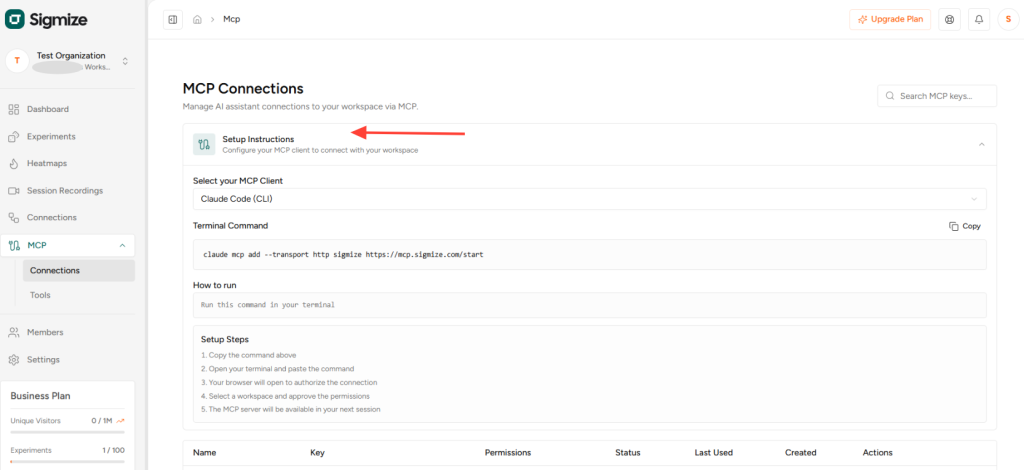
- From the Select your MCP Client dropdown, choose ChatGPT
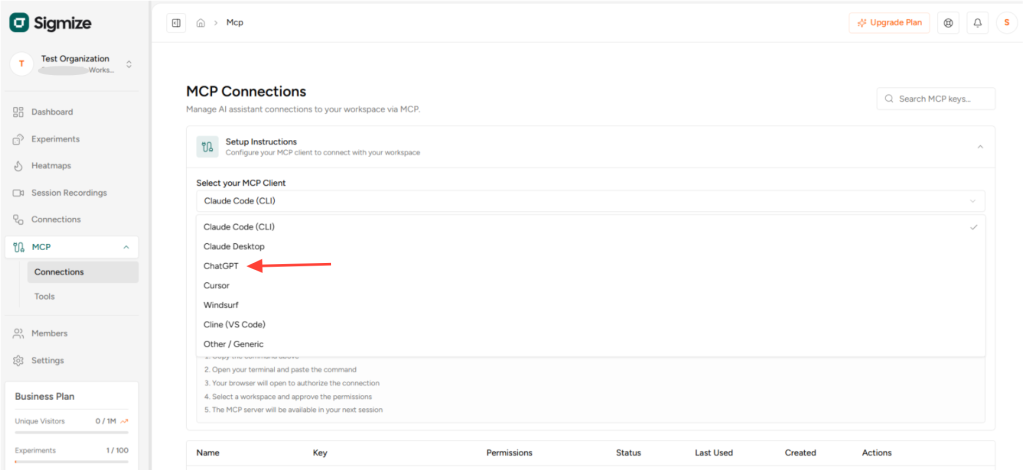
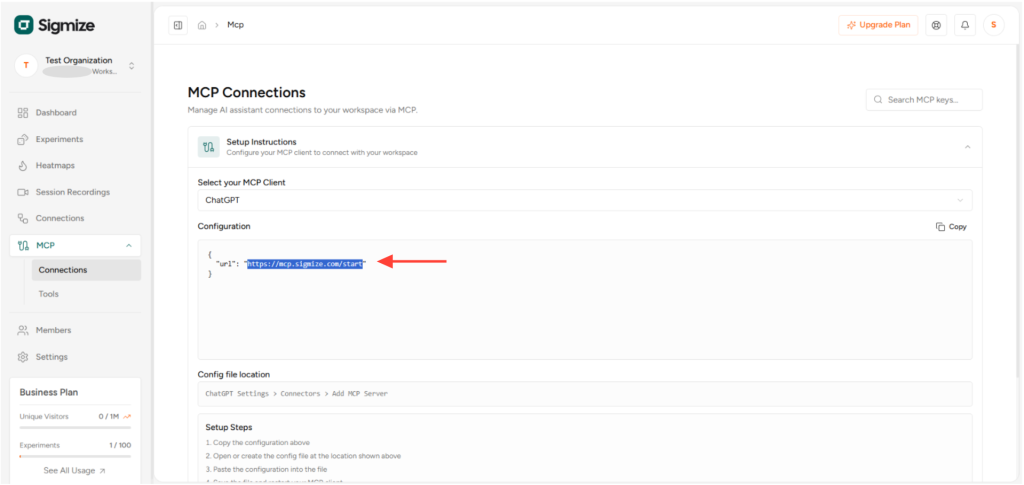
- Copy the MCP Server URL from the configuration (only the URL is required)
Step 2: Open ChatGPT App Settings
- Open your ChatGPT account
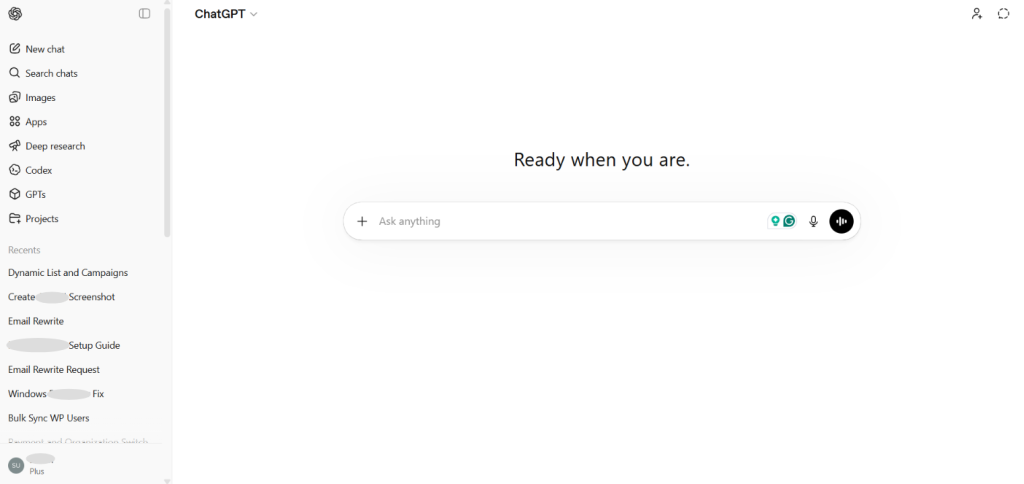
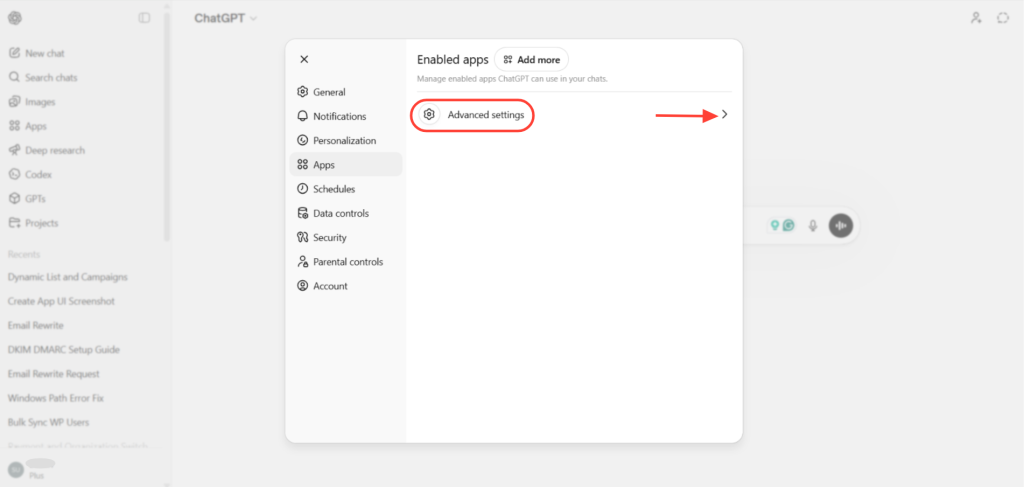
- Click your Profile icon in the bottom-left corner
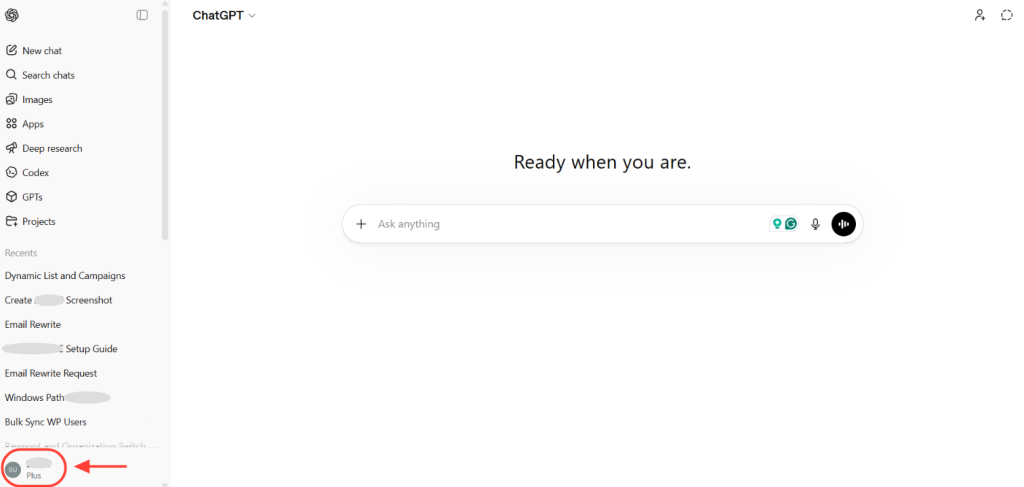
- Click Settings
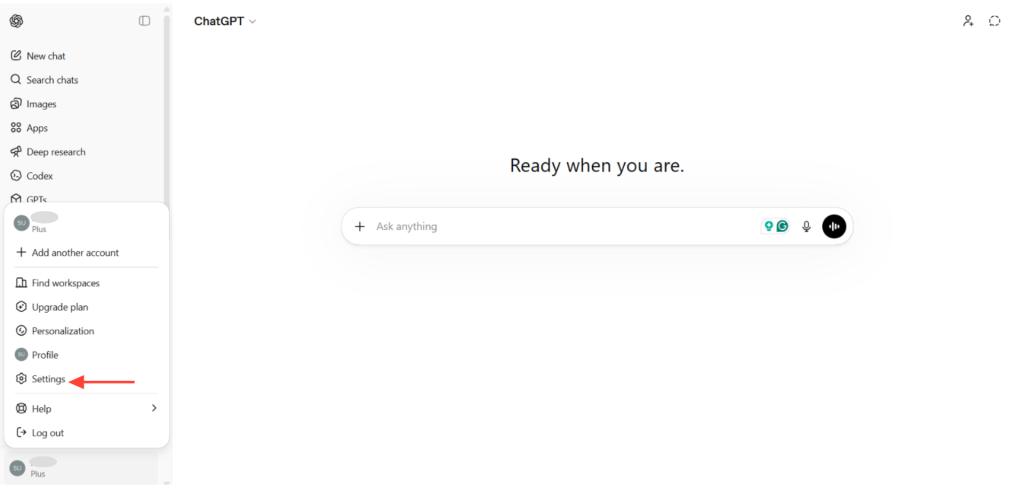
- Navigate to Apps
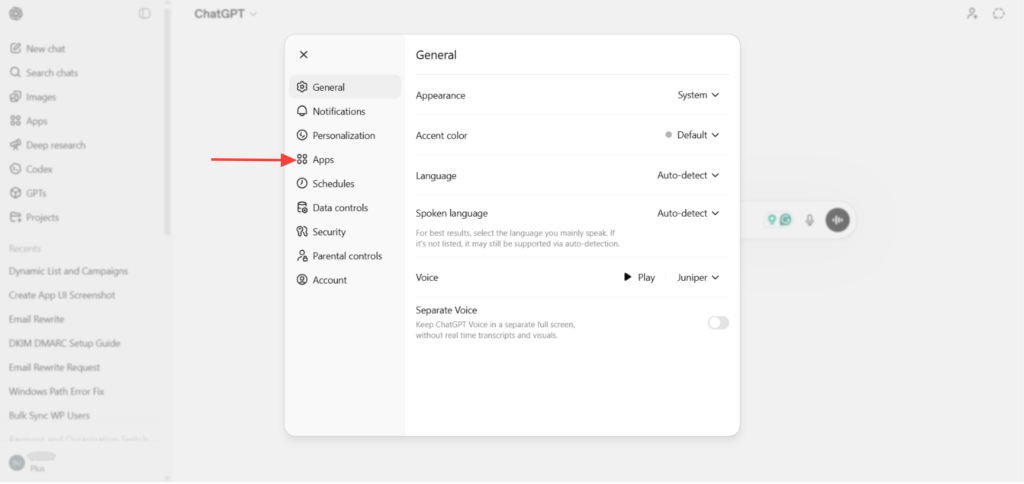
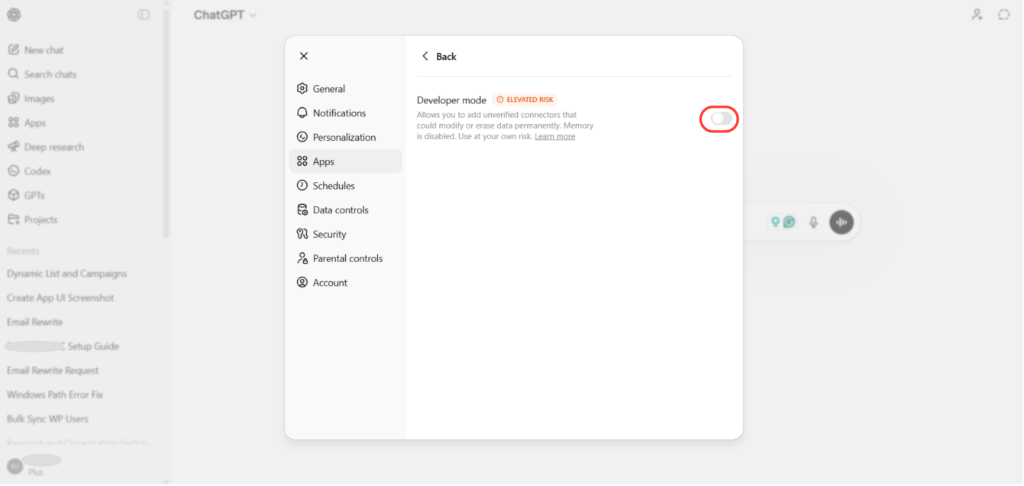
- Click Advanced Settings
- Enable Developer Mode
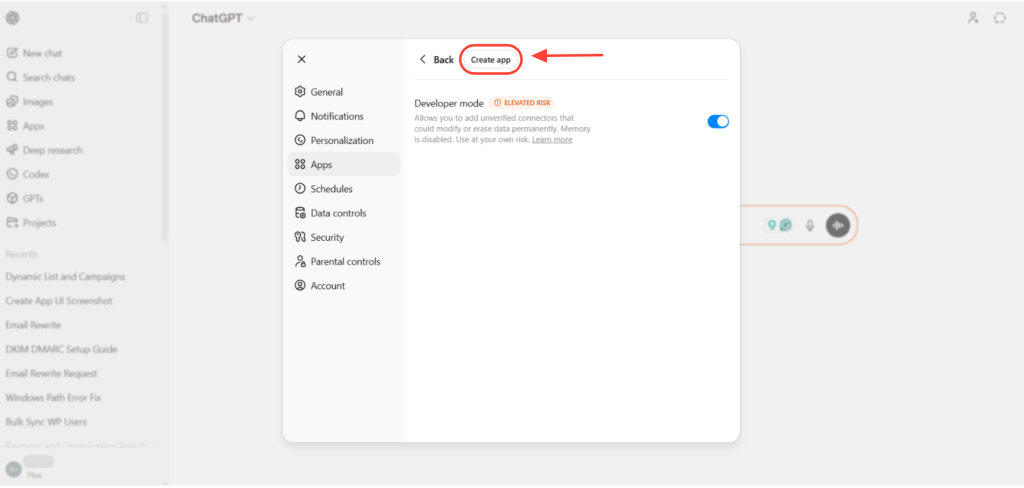
Step 3: Create a New App
- Click Create App
- Enter a name for the app
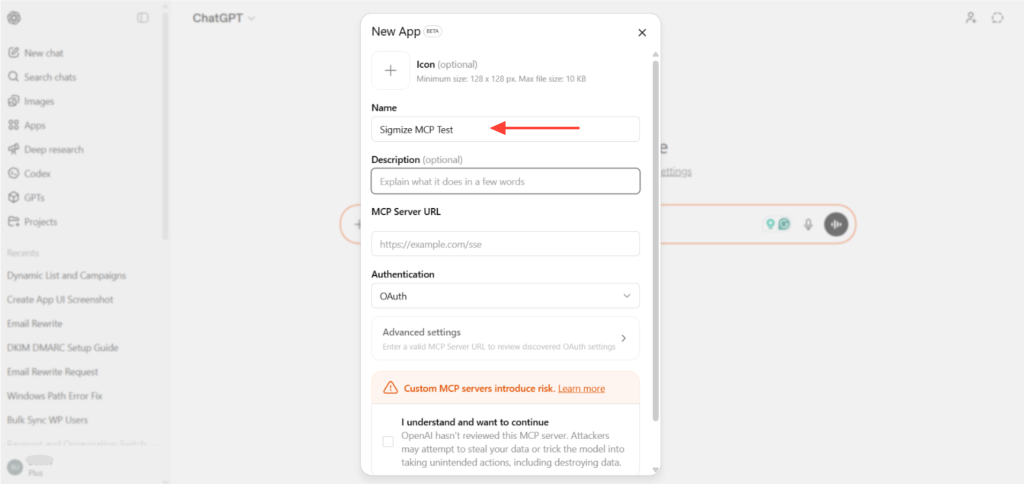
- Paste the MCP Server URL you copied earlier into the MCP Server URL field
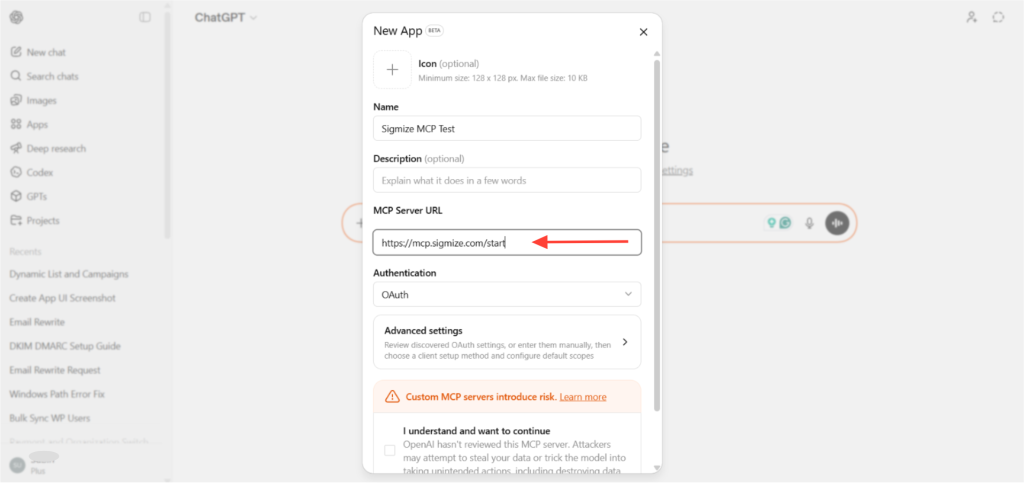
- Set Authentication to OAuth
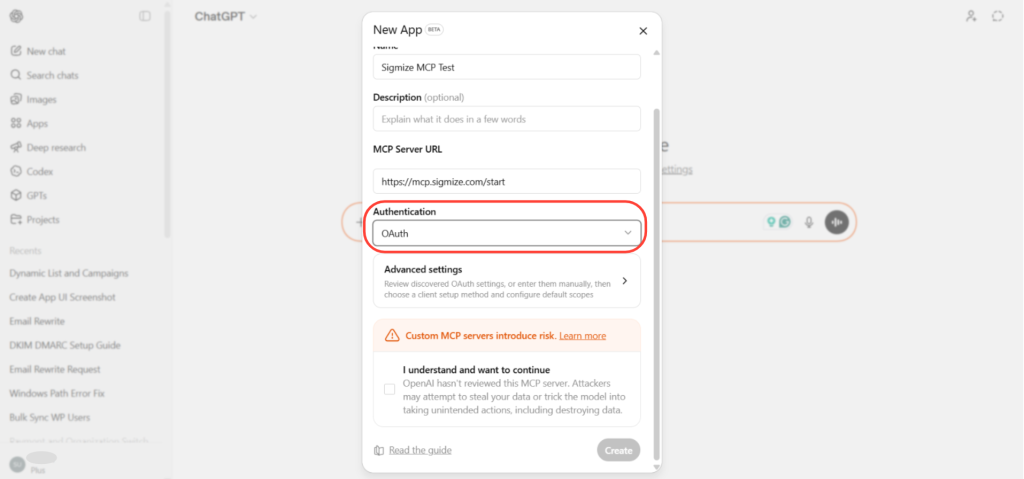
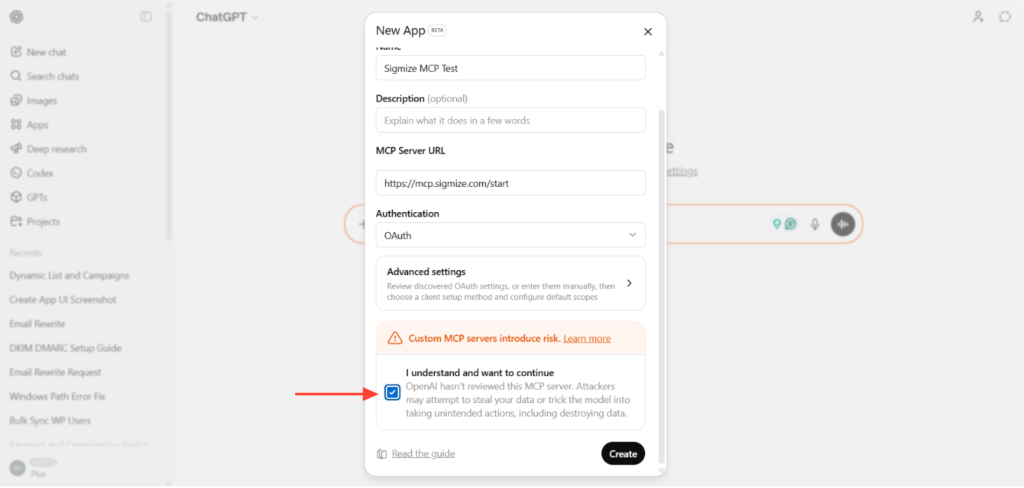
- Select the required permissions
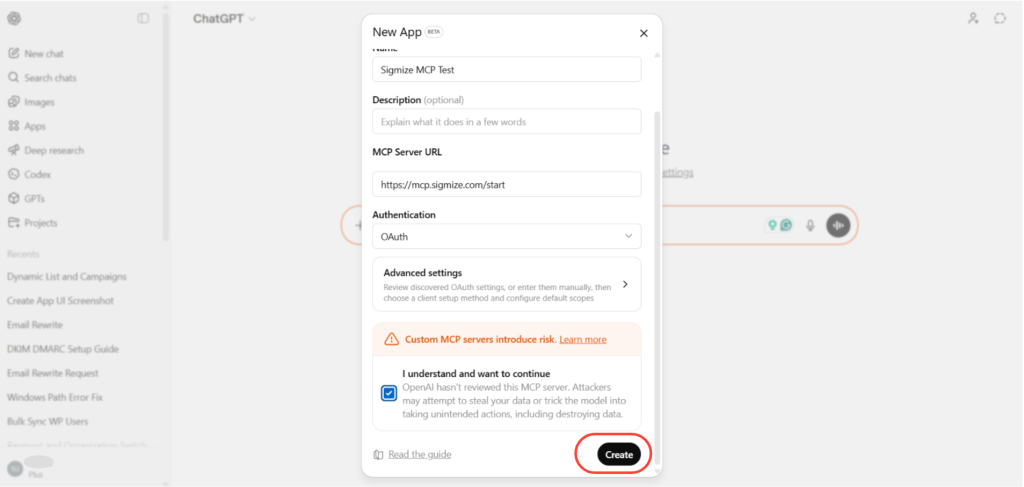
- Click Create
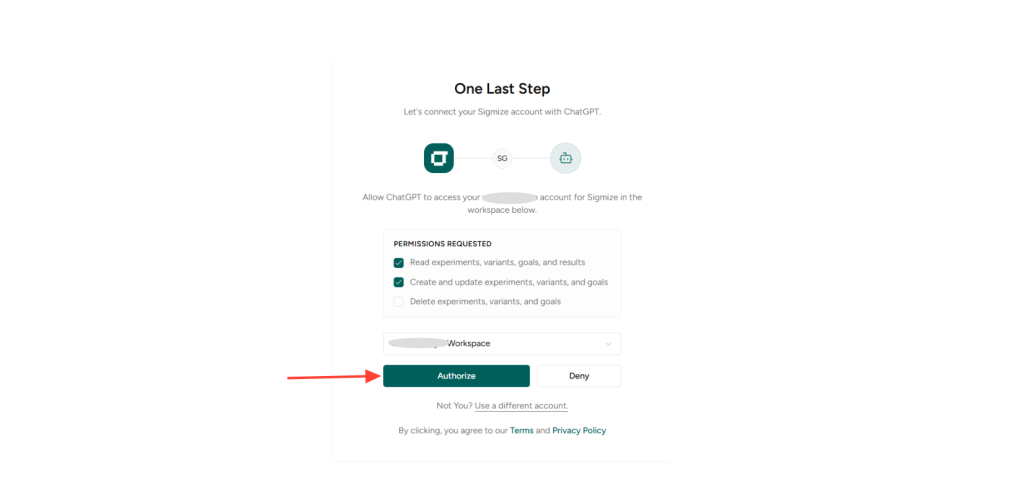
Step 4: Authorize Sigmize
- A popup will appear asking permission to connect with your Sigmize workspace
- Click Authorize to continue
Step 5: Verify the App Connection
- Once authorized, the app will be added to your ChatGPT Apps list
- You can view it by going to: Profile → Settings → Apps
- Inside the app, you will also be able to see the tools available from Sigmize MCP
Step 6: Start Using Sigmize in ChatGPT
- Open a new chat in ChatGPT
- Click the + (Plus) button
- Select your newly created Sigmize app
- Start interacting with Sigmize using prompts such as:
- “Show me contacts added today.”
- “Create a new A/B experiment for my landing page.”
- “What is the statistical significance of my current pricing test?”
ChatGPT will now be able to securely interact with Sigmize using MCP.
Summary
Sigmize MCP allows your AI to:
- Connect securely to your Sigmize workspace
- Perform real actions, create tests, fetch results, and manage experiments
- Follow your natural language commands
- Automate testing workflows without writing any code
Need Help?
If you need any assistance, feel free to contact our support team at [email protected].
We don't respond to the article feedback, we use it to improve our support content.