
- Troubleshooting Missing Styles in Session Replay & Heatmaps
- Sigmize Workspaces User Guide
- Cloning an Experiment in Sigmize
- Sigmize Experiment Lifecycle Guide
- User Profile Management Guide
- How to Invite Members to a Workspace in Sigmize
- How to Switch Organizations in Sigmize
- Let’s set up Organization & Workspace with Sigmize
- Getting Started with Sigmize
- How to Install and Connect the Sigmize WordPress Plugin
Cloning an Experiment in Sigmize
Sigmize lets you clone any existing experiment, regardless of its current status, to create a full copy in Draft state. All configuration is carried over (variants, goals, targeting rules, traffic settings), so you can reuse a proven structure without rebuilding from scratch.
This guide walks through every step of the clone flow and explains what is and is not copied.
Prerequisites
Before cloning an experiment, please ensure the following:
1. You have a Manager or Editor role in the workspace
- Viewer-role users do not see the Clone option in the menu.
- To check your role: go to Settings → Members and confirm you are listed as Manager or Editor.
2. At least one experiment exists in the workspace
- The Experiments list must have at least one row for the Clone option to be accessible.
- If the list is empty, create an experiment first using the + New Experiment button.
How to Clone an Experiment
Follow these steps to clone any experiment in your workspace.
1. Go to Experiments in the left sidebar
- Click Experiments in the left navigation to open the experiments list.
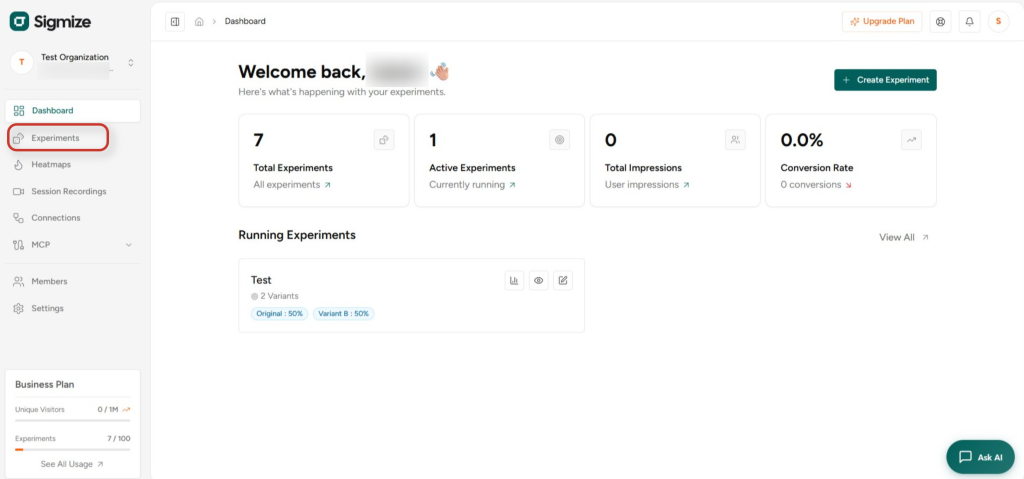
- You will see all experiments in your current workspace with their status, type, and metadata.
2. Open the three-dot menu for the experiment you want to clone
- Hover over the experiment row, a ⋮ (three-dot) menu button appears at the far right of the row.
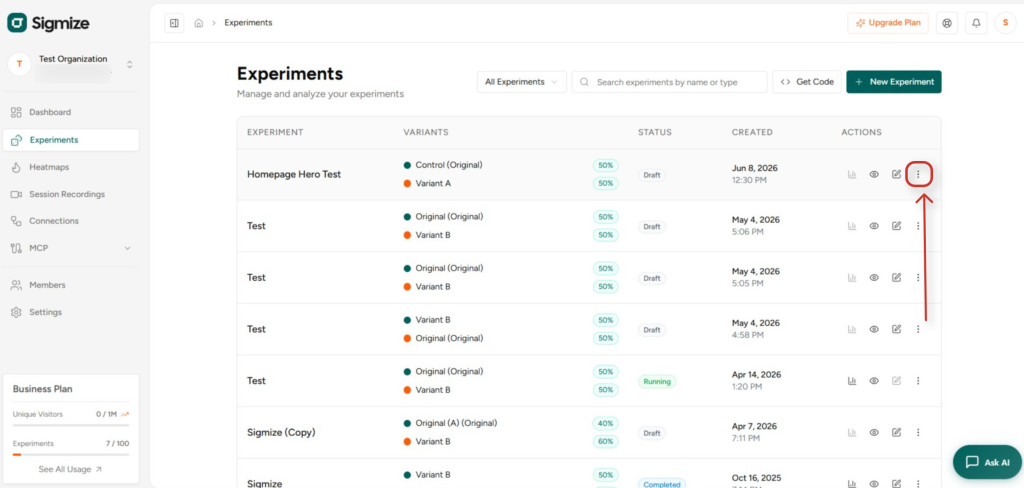
- Click the ⋮ button to open the action dropdown.
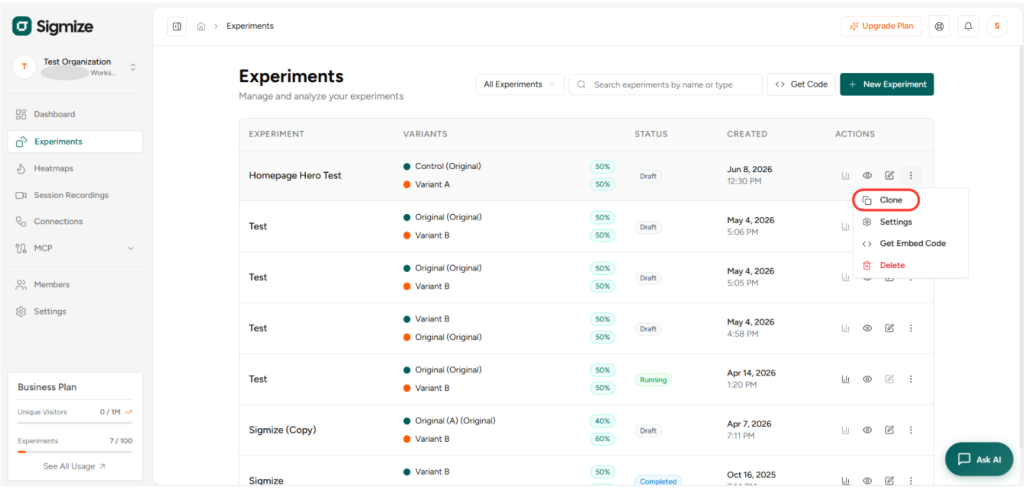
3. Select Clone from the dropdown
- The dropdown shows: Edit, Duplicate, Clone, Archive, and Delete.
- Click Clone to begin the cloning process. No confirmation dialog appears; the action starts immediately.
4. Wait for the Cloning… indicator
- The three-dot button is replaced by a “Cloning…” label with a spinner while the operation runs.
- This typically completes in under two seconds. Do not navigate away during this time.
5. Confirm the clone appeared in the list
- On success, a green toast notification appears: “Cloned successfully!”
- The experiments list refreshes automatically and the new experiment appears with the name format: {Original Name} (Copy).
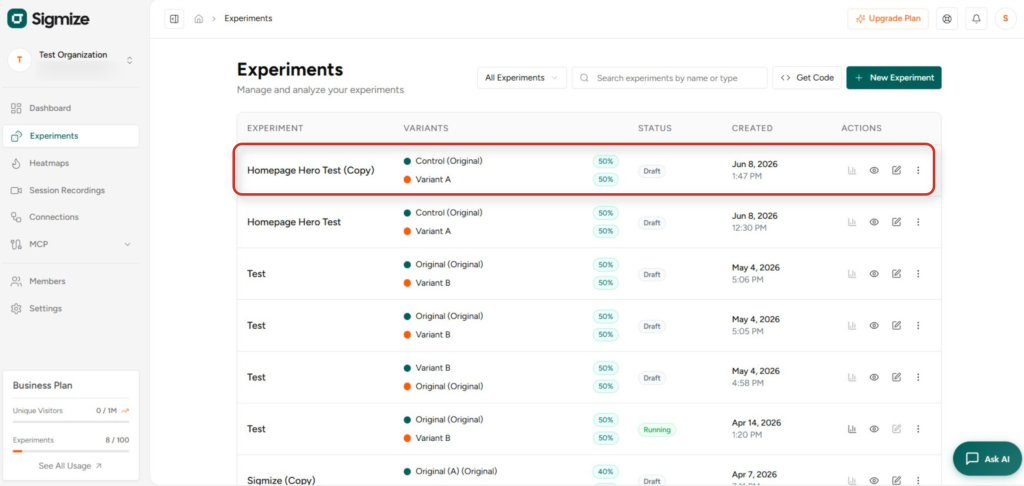
- Example: Homepage Hero Test → Homepage Hero Test (Copy)
What Gets Copied
The table below details exactly what is and is not carried over to the clone.
| Item | Copied? | Notes |
|---|---|---|
| Experiment name | Yes | (Copy) appended |
| Description & hypothesis | Yes | |
| Experiment type (split / element) | Yes | |
| Traffic allocation & priority | Yes | |
| Targeting rules | Yes | |
| Heatmap / session recording settings | Yes | |
| All variants (names, content, traffic %) | Yes | |
| All goals (name, type, config) | Yes | |
| Segment associations | Yes | |
| Status | No | Always reset to Draft |
| Start / end dates | No | Cleared – must be set fresh |
| Historical results / analytics | No | Starts with zero data |
| Assignment history | No | Not carried over |
Post-Clone Checklist
After cloning, review the following before running the experiment:
1. Rename the experiment
- The clone defaults to “{Original Name} (Copy)”. Update the name to reflect the new test’s purpose.
2. Set start and end dates
- Start and end dates are never carried over. Set fresh dates before activating the experiment.
3. Review variants
- Variant content (URLs, selectors, HTML) is copied verbatim. Update any references to old pages or elements if the new test targets a different URL or element.
4. Review goals
- All goals are copied with their original configuration. Confirm that URLs and selectors in goal rules still apply to the new test context.
5. Review targeting / segments
- Segment and targeting rules are copied. Confirm they are appropriate for the new run (e.g., device type, geolocation, audience).
6. Start the experiment when ready
- Once all settings are confirmed, click Start Experiment to activate the clone.
Permissions Required
Only users with the Manager or Editor role can clone experiments. Viewer-role users will not see the Clone option in the three-dot dropdown.
Note: There are no plan limits on the number of clones, and any experiment, regardless of status (Draft, Running, Paused, Completed), can be cloned. Clones always land in the same workspace; cross-workspace cloning is not supported.
Troubleshooting
| Issue | Likely Cause | Fix |
|---|---|---|
| Clone option missing from menu | Viewer role | Check role under Workspace Settings → Members |
| Cloned experiment not in list | Status filter active | The clone is always Draft, check if the list is filtered to Running / Paused |
| Missing variants or goals on clone | Unexpected error | Verify originals exist; if confirmed missing, escalate with both experiment UUIDs |
| 403 error on clone | Workspace role changed | Verify current role in Workspace Settings |
Need Help?
If you need any assistance, please email [email protected], and our support team will be happy to help you.
We don't respond to the article feedback, we use it to improve our support content.